
Sunday, November 30, 2008
Awesome Giveaway spotted...
I found a great giveaway over here! But really, don't go looking at it...I want to win! {It's a giveaway for a Wii & a Wii Fit!} I've never been a huge video game player, but a Wii Fit would be so cool! It would be great to have either system because I could see myself playing video games with Jason and the kids if we had one of these awesome systems...and Free would make it even better!
Saturday, November 29, 2008
Conversation Pebbles
 I saw this cute idea while watching HGTV over the weekend. {I think it was on a Decorating Cents holiday special, but don't hold me to that} Anyways, on one of the tables they were setting for the holidays, they placed the cheap little glass gems {vase fillers} around the centerpiece and also had some of the large ones mixed in with them. The host picked them up and revealed cute little conversation pebbles. I realized I had everything at home to make them and wouldn't have to get out on Black Friday to go get supplies!
They aren't the cutest things, but they really do help spark conversations at the table. I'm sure you could make them cute by using fun papers but I didn't want to limit them to one table scape and figured in this case, simple was better. I plan on bringing them out when we have company and just sprinkling them on the table. Since I still have a little one who likes to put things in her mouth, I won't use the small gems to decorate with. Anyways, I checked at Hobby Lobby while I was out on Saturday and you can get a 2 lb. bag of these large gems for $2.77 so this is a very inexpensive craft. By the way, the ones I used have that iridescent stuff on them but they looked and worked just fine. You can find "perfect large round gems" on ebay and etsy...but they're a lot more expensive and I think these irregular, iridescent ones work just fine for this.
All I did was type up a list of conversation starters that were appropriate for my kiddos and family. You can see in a few examples that I used questions like:
"My favorite thing to do with dad is...", " What do you think Heaven is like?", "What would you do if you were invisible for a day?", "What is your least favorite chore? Why?", "What has been the best day of your life so far?", etc.
I printed them out in size 8 & 9 fonts and made sure that my questions would fit under my pebbles without being cut off. Then, I just traced, cut {a large circle punch would have been great for this...adding that to my Christmas list now} and mod podged the circles to the back side of the stones. I pushed down to get rid of any air bubbles and then topped the back side off with two coats of mod podge to seal them.
My son picked these up at lunch today {because I was lazy and had left at least half a dozen projects I was working on on the kitchen table} and wanted to use them. My husband and I enjoyed listening to our son list 3 things he loved about his sister, explain to us what he thinks dad does at work, tell us his favorite joke and we got in on the fun too. It made for a very pleasant lunch and I think I'll make some more of these conversation pebbles and bring them out for no reason at all instead of waiting for a special occasion. :)
 So these little guys were hard to photograph given the overhead light and their iridescent sheen, but you get the point, right?
Monday, November 24, 2008
Trash to Treasure {Jewelry Organizer}
See this BEAUTIFUL picture I picked up last week at the thrift store? I have just the place for it.
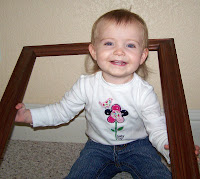
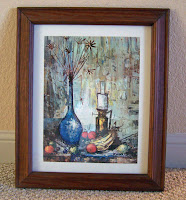 Well, maybe I don't have a place for the picture, but the frame will work for this project. I took off the backing and set the picture and glass aside. See, doesn't it look better already? This is one of my little helpers. Isn't she a cutie? :)


 Then, I repositioned the saw tooth hanger so that my frame would hang horizontal instead of it's original vertical position. Here is what it looks like now:
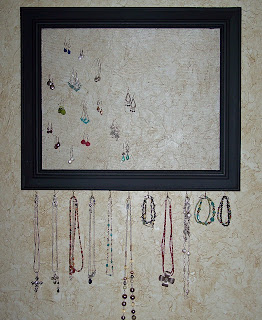 I haven't loaded all my jewelry on yet {but I couldn't wait to share it with you gals} because I realized I need to put another saw tooth hanger on it. With one hanger, the piece tends to move on the wall if the weight isn't even on both sides. It would probably be fine if I was only going to hang earrings on this...but I'll take it down and put a saw tooth hanger on the top right and left sides of the frame. Maybe I'll go do that right now since the baby is sleeping! Then I can finally get my jewelry out of all the little dishes on my dresser and vanity so I can see it all again! I've also got plans of making a smaller version of this jewelry holder to sit on my vanity for my earrings with a post and back. The one I just hung will really only work well with ear wires. How do you organize your jewelry?
 Well, maybe I don't have a place for the picture, but the frame will work for this project. I took off the backing and set the picture and glass aside. See, doesn't it look better already? This is one of my little helpers. Isn't she a cutie? :)
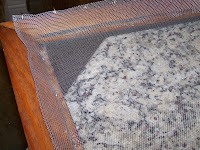
I took the frame outside and spray painted it a matte black. I didn't bother painting the back. Next, I measured and marked on the frame where I wanted to predrill my holes for the hooks for my necklaces and bracelets to hang from. I drilled the holes and screwed in my hooks. Then I simply stapled a piece of metal window screen to the back. I did use quite a few staples because I don't want the screen to move as I'm putting earrings on and taking them off. After I took this picture, I cut off the excess screen and rolled the rough edges close to the frame so that it wouldn't scrape up my walls or be visible from the front side.
 Then, I repositioned the saw tooth hanger so that my frame would hang horizontal instead of it's original vertical position. Here is what it looks like now: I haven't loaded all my jewelry on yet {but I couldn't wait to share it with you gals} because I realized I need to put another saw tooth hanger on it. With one hanger, the piece tends to move on the wall if the weight isn't even on both sides. It would probably be fine if I was only going to hang earrings on this...but I'll take it down and put a saw tooth hanger on the top right and left sides of the frame. Maybe I'll go do that right now since the baby is sleeping! Then I can finally get my jewelry out of all the little dishes on my dresser and vanity so I can see it all again! I've also got plans of making a smaller version of this jewelry holder to sit on my vanity for my earrings with a post and back. The one I just hung will really only work well with ear wires. How do you organize your jewelry?
 Wednesday, November 19, 2008
From "Blah" to "Oooo, Ahhh"
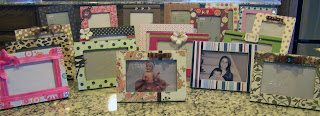
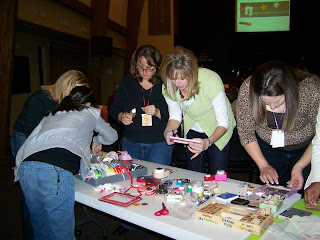
I am proof that you don't have to be a scrapbooker (is that even a word?) to love and use scrapbook papers. In our MOPS {Mothers of Preschoolers} meeting today, we transformed some boring pine 4x6 frames from Ikea and took them from "Blah" to "Ahhh!"
 I received a lot of good feedback from the ladies today and it appeared that everyone was genuinely having a good time. That makes me happy! :) This is my first year as the creative activities coordinator and I've spent a lot of time trying to come up with projects that fit into our budget, our short time frame to complete the project and have them be practical or fun projects (ie: not something they're going to trash on their way out the door). It's been fun teaching some of the ladies new techniques and seeing that sense of accomplishment. I'm hoping to make some craft addicts out of this group!
 I think creative activities are such an important part of a MOPS group! It allows everyone time to get up and move around the room & meet new people, have discussions with other adults AND not be interrupted by your kiddos while doing so, it offers women the opportunity to learn new crafts, and you're able to start and finish a project that you may otherwise not have the time to do at home. I am really enjoying this opportunity as creative activities coordinator and it's forcing me to make time for creativity in my life. I realized a few months ago how little I was doing and how much I missed and needed that for myself. Besides, all the crafty blogs give me SOOO much inspiration and I hope to be able to do MANY of the fun projects I've found with our MOPS group.

Here is just a small sampling of what everyone created:
I received a lot of good feedback from the ladies today and it appeared that everyone was genuinely having a good time. That makes me happy! :) This is my first year as the creative activities coordinator and I've spent a lot of time trying to come up with projects that fit into our budget, our short time frame to complete the project and have them be practical or fun projects (ie: not something they're going to trash on their way out the door). It's been fun teaching some of the ladies new techniques and seeing that sense of accomplishment. I'm hoping to make some craft addicts out of this group! This project can be done in so many ways! For the sake of the above mentioned reasons {time & budget b/c this craft was done for ~75 people} we kept it pretty simple and had the ladies paint the frames with sponge brushes and acrylic paint of their choice. Then, we cut out our scrapbook paper and adhered it to the front. {If I was doing this at home, I'd be covering it with Mod Podge too} Then the ladies got to have fun and embellish to their liking. It was fun seeing how creative some of the ladies got and I'll totally be copying some of their awesome ideas! :) We had a table set up in the back that had an assortment of stamps, scraps of papers, ribbons, rhinestones, stickers, paper punches, paint, fake flowers etc. {If you decide to do something like this with a group of friends or with your MOPS group, see if any of the ladies are willing to share their stamps, paper punches and scraps for the day. That will really help save you some money!}
See the creativity around the ribbons, stamps and rhinestones? :) They all made some great stuff!
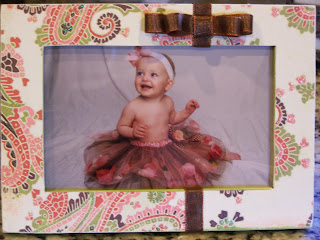
I think creative activities are such an important part of a MOPS group! It allows everyone time to get up and move around the room & meet new people, have discussions with other adults AND not be interrupted by your kiddos while doing so, it offers women the opportunity to learn new crafts, and you're able to start and finish a project that you may otherwise not have the time to do at home. I am really enjoying this opportunity as creative activities coordinator and it's forcing me to make time for creativity in my life. I realized a few months ago how little I was doing and how much I missed and needed that for myself. Besides, all the crafty blogs give me SOOO much inspiration and I hope to be able to do MANY of the fun projects I've found with our MOPS group. Here are two frames that I made. The first one is for my daughters room and that picture was taken the week of her first birthday. I LOVE it! The second one is for my son's room. I couldn't find any 4x6 pics of him last night when I was finishing up my prep work at midnight so I found this old one and used it. I look sooo young...that little booger is now 6 1/2 years old! :) I roughed up the edges of both frames with a little sand paper and I really like the way they turned out.


I found a great tutorial at SplitCoastStampers for this craft. While you're there, check out some of their other free tutorials-lots of cool projects!
Sunday, November 16, 2008
Custom {Organized} Binder Clips
My husband thinks I've lost it. He came in last night and saw me applying Mod Podge to binder clips, shook his head and walked out. Haha! I for one, LOVE them and have already put them to use organizing my stacks of papers!
So, here is a QUICK and easy project that will help you stay organized and would make a great addition to a teacher gift, too.
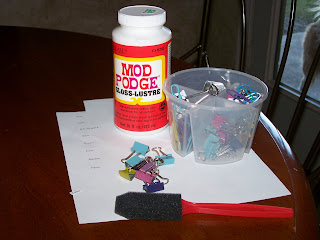 You'll need :
The binder clips come in varying sizes but the ones I used here have clips that measure 3/4" long and 1/2" high. I used a text font size 11 so that my text would fit on my clips once cut out. Adjust your font size to fit your clips.
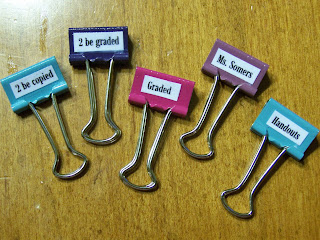
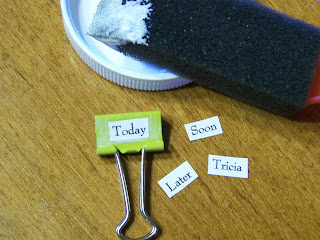 So, determine what sayings you want. I chose to do "today", "soon", "later", my name, my kids and husband's name all for sorting the papers, bills, field trip slips, etc. that seem to find their way to my kitchen counters. I also did a few sets with things like "2 be graded", "graded", "2 be copied", "handouts", and teachers names for teacher gifts. Type them up in a word program and print out. I then cut each word out and applied a thin layer of Mod Podge to one side of each clip. Next, I positioned each word in the middle of the clip while the Mod Podge was still wet. I let that coat dry and brushed another coat on top to seal and I was done.
So, here is a QUICK and easy project that will help you stay organized and would make a great addition to a teacher gift, too.
You'll need :*Binder Clips {I had an assortment of cute colored ones from Staples-that's what is in the plastic tub, but plain black ones will be fine also.}
*Mod Podge
*sponge brush {or your finger if you really want to get messy}
*Your sayings printed out
*scissors
The binder clips come in varying sizes but the ones I used here have clips that measure 3/4" long and 1/2" high. I used a text font size 11 so that my text would fit on my clips once cut out. Adjust your font size to fit your clips.
So, determine what sayings you want. I chose to do "today", "soon", "later", my name, my kids and husband's name all for sorting the papers, bills, field trip slips, etc. that seem to find their way to my kitchen counters. I also did a few sets with things like "2 be graded", "graded", "2 be copied", "handouts", and teachers names for teacher gifts. Type them up in a word program and print out. I then cut each word out and applied a thin layer of Mod Podge to one side of each clip. Next, I positioned each word in the middle of the clip while the Mod Podge was still wet. I let that coat dry and brushed another coat on top to seal and I was done. 
Super quick, easy and cute...not to mention, practical. What other sayings or words would you put on yours?
Thursday, November 13, 2008
Creating a {Cute} purse size calendar...
{Edited 12/1/08 to add more pictures and another embellishment to the calendar!}
Chris, over at Just a Girl, was hosting an I Can Make That party on her blog this past Monday. I thought I'd make a submission and be fashionably late. Hey, I'm new to craft blogging...that's my excuse and I'm sticking to it. Check out her site for TONS of cute ideas and gifts that you can make also!
{First, a disclaimer: several of my friends will probably be receiving these as gifts this year, so please act surprised when you get one and pretend that you never saw this post!}
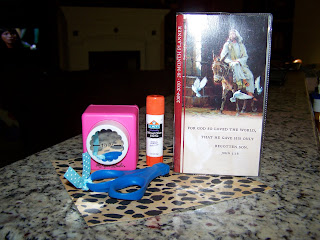 {Small calendar in clear sleeve, piece of scrapbook paper, scissors, glue stick, paper punch and not pictured: ribbon, glue, stamp pad and stamps}
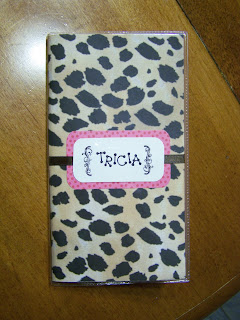 What do you think? I certainly think it's much cuter now than it was when I originally purchased it. Oh, and did I mention that the total cost for this project was $1.00? I found the calendar at DollarTree and everything else was stuff I already had and you probably do too. If you make one, please comment and let me know. :)
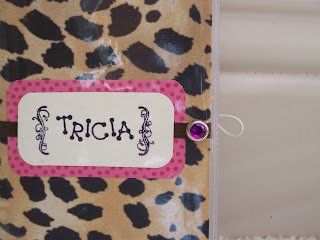
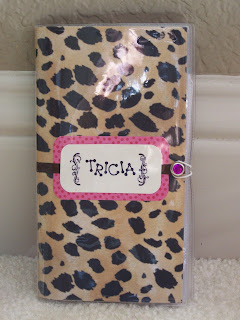
{I've made several more of these since I first posted this but I won't show you pics yet because they're going to be gifts. Anyways, I have gone back and added a cute rhinestone brad to the front cover (punched a whole through the plastic cover, ribbon, paper and all) and added a piece of elastic that is held in place with an eyelet on the back) I found the idea for this over here. Now I like my calendar even more!}
{First, a disclaimer: several of my friends will probably be receiving these as gifts this year, so please act surprised when you get one and pretend that you never saw this post!}
Two girlfriends from my MOPS group came over this morning for a few hours to help get our next craft prepped and make some examples for our next meeting. We spent the morning making cute picture frames {I'll post that craft next week after our meeting} and I decided after they left that I'd take advantage of having half my supplies sprawled out all over the kitchen and make some more stuff instead of cleaning. :)
Here is my submission to the I Can Make That {seriously, anyone can do this...cheap, quick and something everyone really uses. This would be great as a gift for a neighbor, stocking stuffer, mail man, friend, etc... Scroll all the way down to see just how cheap thrifty this project is}
So, up first was a quick transformation of a purse size calendar. I started with all of this:
{Small calendar in clear sleeve, piece of scrapbook paper, scissors, glue stick, paper punch and not pictured: ribbon, glue, stamp pad and stamps}1. Remove the calendar from it's plastic sleeve and trace it on the backside of the scrapbook paper.
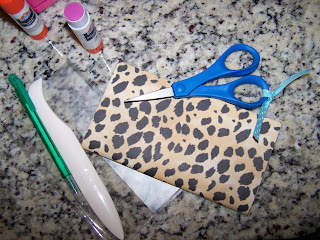
2. Apply glue stick to the backside of the paper and adhere to the cover of the calendar.

Your calendar will now look something like this.
(I used a bone folder...that white thing next to the green mechanical pencil...to smooth out any air bubbles and make sure the paper is adhered. You can also use your finger or save those fake credit cards that come in your junk mail and use them to smooth your paper)
Next, I just embellished it a little. I didn't want to do too much with this wild pattern so I just stamped my name on a piece of paper, framed it with a scrap and glued down some ribbon. I put it back in the plastic sleeve and I was done! {If yours doesn't have a plastic sleeve, you may want to apply a coat or two of Mod Podge to keep it from getting torn up and ruined in your purse.}
Click on the picture for a larger view and you'll see that it's in the plastic sleeve.
 What do you think? I certainly think it's much cuter now than it was when I originally purchased it. Oh, and did I mention that the total cost for this project was $1.00? I found the calendar at DollarTree and everything else was stuff I already had and you probably do too. If you make one, please comment and let me know. :)
{I've made several more of these since I first posted this but I won't show you pics yet because they're going to be gifts. Anyways, I have gone back and added a cute rhinestone brad to the front cover (punched a whole through the plastic cover, ribbon, paper and all) and added a piece of elastic that is held in place with an eyelet on the back) I found the idea for this over here. Now I like my calendar even more!}
Tuesday, November 11, 2008
Sprucing up the fireplace with wood appliques
We had some friends over Saturday night for dinner and to play cards and somewhere during the conversation I mentioned how I would LOVE to change our fireplace. Our home came with a WHITE cast stone fireplace and mantle. It's nice and all...it's just that it's the only thing that is white in the whole room and it's HUGE and pretty much the focal point. I would love to stain it or something to make it a little more warm {and less white} but my husband insists that it can't be done and would ruin it. {sigh} So, my friend Angela came up with a brilliant idea {at least, I think it's brilliant} of adding a medallion or applique to the fireplace to tie it all together. So, what do you think? (It's the small fleur de lis in the middle of the fireplace that I'm talking about)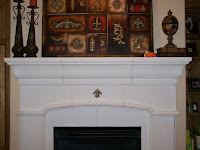 I was at Joann's buying some more fabric for a window mistreatment (from Nesting Place). I'll show you what I did with before and after pics soon. Anyways, while I was there, I decided to take a look at their wood appliques and I found both of these for $1.99 (and a 40% coupon).
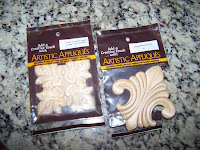
I was at Joann's buying some more fabric for a window mistreatment (from Nesting Place). I'll show you what I did with before and after pics soon. Anyways, while I was there, I decided to take a look at their wood appliques and I found both of these for $1.99 (and a 40% coupon). I already had black and gold paints and a plethora of sponge brushes at home. So, in a matter of minutes, I h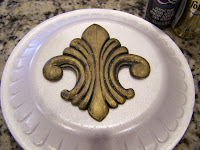 ad them looking like this:
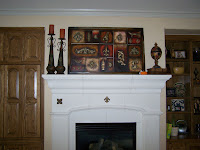
So what do you think? No appliques, just one {the fleur de lis or the square in the center} or the fleur de lis flanked by two square medallions (which I need to go buy another but you get the idea)? Leave a comment and let me know what you think! Oh, and ignore all the clutter on the built in bookcase...need to clear that out and reorganize it all!
 ad them looking like this:
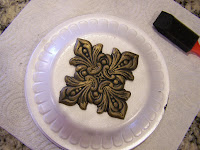
 All I did was paint them black {graphite if we're being technical here} with a sponge brush and then used my blow dryer to speed up the drying time because I'm that impatient. :) Then I applied gold metallic paint with my finger so that the raised surfaces would become gold and the recessed areas would remain black. It took about 3 minutes to paint and dry these gals. Then, I applied them to the fireplace with scotch tape to see what they looked like and which one I wanted in the center. Now, I may go back and buy one more of the serrated squares {the one on the right in the picture above} and apply both of those to the fireplace also...hmmm....too many choices to make. Three might be getting too busy!?! Oh well, I'll still buy another one to see how I like it and then I can always use those appliques to spruce up something else.

So what do you think? No appliques, just one {the fleur de lis or the square in the center} or the fleur de lis flanked by two square medallions (which I need to go buy another but you get the idea)? Leave a comment and let me know what you think! Oh, and ignore all the clutter on the built in bookcase...need to clear that out and reorganize it all!
Monday, November 10, 2008
Tip Junkie Shop-a-thon and 12 days of Junkie Giveaways

Tip Junkie is one of my favorite blogs. Laurie is hosting a Mom-preneur shop-a-thon and a 12 days of Junkie GIVEAWAY that starts tomorrow (Tuesday). Go on over to her site Tip Junkie and check it out! I find SO many cute ideas from her blog! I can't wait to see what she gives away this time. {Hoping I'll win something this time!}
Friday, November 7, 2008
Embellished Notebooks
I really need to figure out my camera settings and learn how to take better pictures! Thankfully our next speaker at MOPS (Mothers of Preschoolers) will be covering this topic. Yeah! Hopefully you can get a general idea despite my terrible picture. I was going to take more pics but then my camera battery died. I'll add that to my growing list of things to do today. Here is the first craft we did in our MOPS group this year. It's a bit of a challenge trying to come up with inexpensive crafts that you can do in a short amount of time with 50 or so women. :)
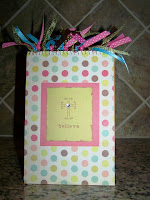 Anyways, you could use this idea to alter any spiral notebook but I really like the steno books with the spiral at the top. (Think of all the not-so-cute notebooks you can find for less than a dollar...oh, the possibilities!) You simply cover the notebook with scrapbook papers- including the spiral. I just made small cuts in the paper next to each spiral in order to completely cover the front and pressed the paper down between each spiral and glued. Because we're limited on time at our meetings, we just used a glue stick but when I make these at home, I use Mod Podge to adhere the paper to the notebooks and to seal it. Then you embellish with stamps, rhinestones, buttons, brads, stickers, etc. and then cut assorted ribbons that match your papers and knot onto each spiral. It's a quick and easy project and it seemed to go over well with the ladies in my MOPS group.
I had taken this picture before I decided to start a craft blog. In the future, I'll take more pics so you can see the progress and steps to completion. :) Now I'm off to see the dentist and get a new camera battery. Have a great weekend!
Anyways, you could use this idea to alter any spiral notebook but I really like the steno books with the spiral at the top. (Think of all the not-so-cute notebooks you can find for less than a dollar...oh, the possibilities!) You simply cover the notebook with scrapbook papers- including the spiral. I just made small cuts in the paper next to each spiral in order to completely cover the front and pressed the paper down between each spiral and glued. Because we're limited on time at our meetings, we just used a glue stick but when I make these at home, I use Mod Podge to adhere the paper to the notebooks and to seal it. Then you embellish with stamps, rhinestones, buttons, brads, stickers, etc. and then cut assorted ribbons that match your papers and knot onto each spiral. It's a quick and easy project and it seemed to go over well with the ladies in my MOPS group.I had taken this picture before I decided to start a craft blog. In the future, I'll take more pics so you can see the progress and steps to completion. :) Now I'm off to see the dentist and get a new camera battery. Have a great weekend!
Wednesday, November 5, 2008
My new craft blog
Well, I've decided to delete our family blog and create a blog dedicated to my addiction instead: crafts! :) I didn't want to make our family blog private and I didn't want identifying info out on the web about my kids (why did I put our last name in the url...rookie mistake?) I haven't updated it since this summer and decided to just delete it all together. So, now you can check here and see what we're up to. I'm sure I'll post pics of the kids when we're doing crafts together but I'll probably refer to them by their first initial or something instead of their full names. If you'd like to see more pics of the kids, email me and I'll hook you up. (I'm adding pics pretty regularly on my facebook page now, too).
I've got a growing list of handmade gifts I want to make this year. I intend to post links to tutorials but probably won't post my pics of finished products until after Christmas (that is, if I get around to actually making all the gifts). I hope that since I'm thinking about it now, I'll actually get a few gifts made instead of waiting until the week before Christmas to get started. :)
I'll post some links soon but now I'm off to spruce up this blog with a cool background and a list of all my favorite blogs Istalk follow.
I've got a growing list of handmade gifts I want to make this year. I intend to post links to tutorials but probably won't post my pics of finished products until after Christmas (that is, if I get around to actually making all the gifts). I hope that since I'm thinking about it now, I'll actually get a few gifts made instead of waiting until the week before Christmas to get started. :)
I'll post some links soon but now I'm off to spruce up this blog with a cool background and a list of all my favorite blogs I
Subscribe to:
Posts (Atom)


