These memo boards are super fast to make and can be made to match any room and decor. There are many different ways to make these...but here is what I did.
I started with a stretched canvas, some fabric, ribbon, decorative brads, staple gun and an exacto knife. I am terrible and rarely measure anything, so I just guess at how much stuff I'll need...sometimes it works out, sometimes it doesn't and I have to make a second (or third) trip to the craft store. The amount of fabric and ribbon you'll need will depend on the size of your canvas.

There are tons of tutorials online about how to make these so I'll spare you all the steps, but I bet you can figure it out yourself. Besides, the back doesn't have to look nice, no one will see it! I simply stretched the fabric over the front, stapled in the back (folding and trimming bulk at the corners). Then, I laid out the ribbon in a diamond pattern and stapled each ribbon in place on the back also. I used my exacto knife to cut a small slit through the ribbon, fabric and canvas so that I could poke a rhinestone brad through all the layers and hold the ribbon tight to the board. Then I hung it in place and tacked up a few of my ideas and notes for projects I want to make.

 Now, I think this little crafty corner is complete! {and my last picture of this space...I promise!}
 See some of my bead stuff laying on the desk? I was actually in my crafty space making some jewelry last night (but didn't get it all put away because my daughter woke up sick...again). My HUGE goal for 2009 is to FINALLY get serious about turning my hobby into a little extra $$$. I'm considering opening an etsy store but also looking for some craft shows in the DFW area. Anyone know about any spring craft shows in the DFW area?


 Now, I can see all my embellishments at once and they fit in my desk drawer. This particular organizer has 24 seperate containers within. I love it (but not as much as I love the new peg board)
 Here is another shot of the craft room. I already shared pics of the new peg board and desk {Have I mention yet that I love them? Didn't think so...I love them!} I reorganized some things in the closet to make better use of the space and added a second clear shoe rack to the other closet door. If you don't already use these in your home, I HIGHLY encourage you to get some! I use them on just about every closet or pantry door in our house. I use them for medicine and first aid stuff in the master bathroom. In the front entry way, they sort shoes, gloves, scarves, mittens, bug sprays, leashes, etc. In the kids rooms, they sort small toys and shoes. In my craft room, they sort all my stuff that I use frequently: glues, scissors, punches, markers, colored pencils, etc. I could go on and on about how awesome the cheap clear plastic shoe organizer is!
 Well, little miss priss is up from her nap now. We had a busy morning at MOPS and we did a really fun craft today. I can't believe that I forgot my camera! Hopefully, I'll have some really nice friends that will let me take pictures of what they created. I taught our group how to make no-sew fabric appliques today and it seemed to go over really well. I'll post pictures and directions as soon as I can get some pics taken.
 Here is the "AFTER"
 Better? I certainly think so! This lovely transformation cost less than $50. I moved the table that was covered in a cloth in the previous photo into the kids playroom for crafts and puzzles. Then, I began the search for a desk and chair that would fit into the corner. I found both at a local thrift store for $30.00. Solid desk, but it was in need of some TLC and of course, black spray paint. The chair was the same color as the desk and had an awful green cushion tied on.
  Two coats of black satin spray paint, mod


 It feels so good to get this room organized! I've still got a few more things to do and then I want to paint and redo the bedding in this room...but it will have to wait for right now. I'll be posting lots of other craft room organizing ideas this week so make sure you check back soon!


 I've also redone a desk for my craft studio but still need to buy some hardware for it. Hopefully I'll get that done this afternoon and post those pics soon.
 And here she is modeling one of her new bows. Okay, really, I just wanted to show you how cute she was (because you don't really notice the bow unless you're looking for it). Little Miss B was sitting in the front window singing with her snow globe. Yes, I do know it's mid-January but I can't put this away yet. The kids LOVE this silly, cheap, plastic snow globe from CVS. My hubby didn't want to buy it but has since admitted it was probably the kids favorite purchase from Christmas. It's all plastic so the kids can handle it and I don't freak out if they drop it. It's got a little fan inside that blows the fake snow and it sings several different songs that the kids adore. Seriously though...this picture just made my morning. :)


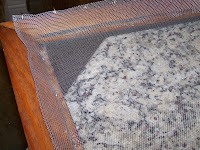 Then, I repositioned the saw tooth hanger so that my frame would hang horizontal instead of it's original vertical position. Here is what it looks like now:
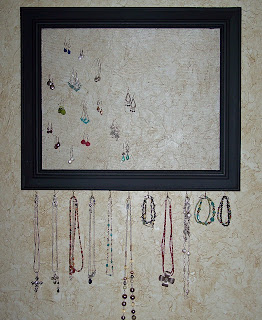 I haven't loaded all my jewelry on yet {but I couldn't wait to share it with you gals} because I realized I need to put another saw tooth hanger on it. With one hanger, the piece tends to move on the wall if the weight isn't even on both sides. It would probably be fine if I was only going to hang earrings on this...but I'll take it down and put a saw tooth hanger on the top right and left sides of the frame. Maybe I'll go do that right now since the baby is sleeping! Then I can finally get my jewelry out of all the little dishes on my dresser and vanity so I can see it all again! I've also got plans of making a smaller version of this jewelry holder to sit on my vanity for my earrings with a post and back. The one I just hung will really only work well with ear wires. How do you organize your jewelry?
 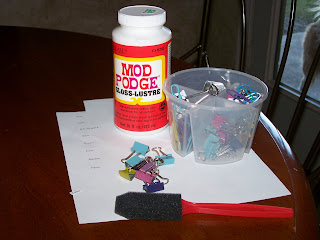 You'll need :
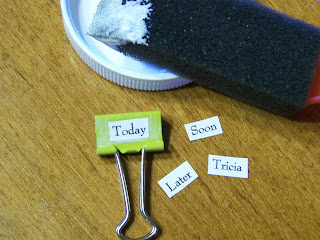 So, determine what sayings you want. I chose to do "today", "soon", "later", my name, my kids and husband's name all for sorting the papers, bills, field trip slips, etc. that seem to find their way to my kitchen counters. I also did a few sets with things like "2 be graded", "graded", "2 be copied", "handouts", and teachers names for teacher gifts. Type them up in a word program and print out. I then cut each word out and applied a thin layer of Mod Podge to one side of each clip. Next, I positioned each word in the middle of the clip while the Mod Podge was still wet. I let that coat dry and brushed another coat on top to seal and I was done.