Showing posts with label Quick and Easy Crafts. Show all posts

Tuesday, July 28, 2009

I'm baaaaccckkkk {is anyone still out there?}....

Well, it's only been 5 months since I updated...LOL Anyone still stop by? If you do, please leave a comment and say hello. :)

Life has been a little crazy this year and I just lacked the time to keep up with the blog. We've made the decision to homeschool this upcoming school year (for a number of reasons) and I'm really excited and nervous about it all at the same time. Summer is almost over and I think I'm about 95% certain on the curriculum we're going to use.

The kids are growing like weeds and I thought I'd just share a few quick and easy boredom buster ideas that we've been doing recently...

I saw this idea in Family Fun a few weeks ago and decided to give it a try. You take a plastic bottle, rinse it out, cut the bottom of it off and secure a small piece of a terry towel or washcloth over the cut end with a rubber band. Then you just get the towel damp and dip the end in a shallow bowl full of dish washing soap...and blow and blow and blow.

It's super easy, fast, free with items you already have and great entertainment. It kept my kids busy for about 45 minutes! See how many bubbles it's producing? (Oh, and my blogging bud Beckie said they did this in the bathtub recently..certainly going to try that soon!)

Here is another quick idea: {Chalk paints} Skip to my Lou did a post about this recently and we decided it would be a great activity for today. Head on over here for the directions on mixing up your own. After lunch, the kids helped me measure the corn starch and added the water and food coloring. It was also a great lesson in mixing colors and kept them occupied until the paints ran out. The kids used an assortment of paint brushes but really seemed to prefer the cheap sponge brushes since they'll soak up so much of the paint. We also brought out the chalk and the kids drew pictures and then painted those. It's going to rain again soon so we'll have a blank canvas again for tomorrow. :)

Wednesday, February 25, 2009

Fun with no sew appliques

I've been in a crafting slump the last few weeks. I thought I'd have time to escape to my craft room some this past weekend...but it didn't happen. I did upload some pictures from my camera and realized I hadn't done a post about the no sew appliques yet. So, here we go...


See, I even took a goofy pic of myself in the mirror (which needs to be cleaned by the way) so yall could see my appliqued t-shirt being modeled! :)

I taught the ladies in my MOPS group how to make no sew appliques last month but forgot to take my camera to the meeting (I know, I know...won't let it happen again!) Because of sick kiddos, I've missed both meetings this month and haven't had a chance to snap pics of any of the awesome appliques they made. I did happen to snap a few pics of some items I appliqued at home though. Will yall forgive me?


This is a blurry close up of the applique I'm wearing in the above shot. Recognize the material? It's a scrap left over from this. I used e6000 and applied three rhinestones to the fleur de lis after I'd ironed on the applique. You can see them better in the first shot.

Here is my silly boy modeling his rockin' guitar applique tee. I found the clip art online and resized the image in my word processing software. He loves this shirt! The material is an orange, yellow, red, black and white flame print. My son said it was "so cool!"

You can find directions for making appliques all over the web. Here are two links to get you started here and here. It's really late (or early, depending on how you look at it) and I'm not thinking clearly so I'm more than happy to answer questions in the comments area if needed.

In our MOPS meeting, we created really cute tote bags. I purchased black canvas bags from an ebay seller in bulk and then the ladies made some adorable appliques. Most of the ladies made adorable monograms or layered cute crosses cut from zebra print fabric or other cute coordinating patterns. I promise I'll post some pics of them once I snap some.

If you don't sew down your applique (by hand or by machine) some fraying will occur. I happen to like that look. :) I've also realized you can touch up the appliques with a hot iron if sections seem to lift up. This is great to know if your sewing skills are lacking like mine! I can sew straight lines...but curves are not so pretty! I did make a fleur de lis for a tote bag and practiced sewing on it. It looks terrible! Why did I choose to practice on an applique with so many curves? Is there some secret to sewing small curves? Please tell me there is some super cool secret that I'm not aware of! Otherwise, I guess I'll have to find some time to spend at my machine and figure it out.

Monday, February 2, 2009

Quick Kids Costumes

I know it's not Halloween but I'm doing a post on kids costumes today. My son LOVES to play dress up and I bet a lot of your kids do, too. We also seem to have a few events at school that require them to dress up as their favorite story book character or what they want to be when they grow up.

Last week, the first graders at our school had a Fairy Tale Ball. Connor decided he wanted to be Robin Hood and this is what we came he came up with. {Note: the school sent home a note telling the kids to not dress up in their Halloween costume but to please come up with something creative at home...love that!} Despite the quirky, stiff lipped smile, he was REALLY excited about this costume. Any of your kids smile like this? I know my little brother always did and it drove my mother nuts!

For this costume we used the following:
  • green t-shirt ($2.00 at Hobby Lobby)
  • an old belt
  • 1 large sheet of green craft foam for the hat
  • pipe cleaners for the arrows
  • feathers for the hat and tips of the arrows
  • paper towel tube for the arrow holder (don't know what it's called)
  • sheet of tan felt with pennies inside, twisted shut with a pipe cleaner and looped through the belt to stay in place
  • yarn we already had in the craft closet

I found this fun site that teaches how to make several types of kids hats here (and it's step by step videos...no trying to decipher wierd directions and fold lines!) This is where we found the directions for the Robin Hood hat and used the large craft foam sheet instead of construction paper. Any of the hats on her site would be really cute for a birthday party!

Connor was so proud of his costume, especially since he helped make it. Here is his robot costume from Halloween. Some card board boxes sprayed silver, dryer duct, old shoes sprayed silver and various "things" Connor helped find and make to create his robot costume. The colorful stuff on the front and sides are those glow in the dark bracelets. We hot glued them on just before he walked out the door. It looked really neat once it got dark!

I'm sure we'll be making many more costumes in the future. Thankfully, my son likes being creative as well and we really enjoy making the costumes together. Do you have any favorite costumes you've made with or for your kids? Any great sites where you get ideas from?

Saturday, January 24, 2009

Fabric covered {Memo/Message/Idea Board}

I was missing one final piece in my little crafty corner...a memo/message/idea board. I had planned on making it Friday, but the stomach bug struck our house and my plans were delayed.

These memo boards are super fast to make and can be made to match any room and decor. There are many different ways to make these...but here is what I did.

I started with a stretched canvas, some fabric, ribbon, decorative brads, staple gun and an exacto knife. I am terrible and rarely measure anything, so I just guess at how much stuff I'll need...sometimes it works out, sometimes it doesn't and I have to make a second (or third) trip to the craft store. The amount of fabric and ribbon you'll need will depend on the size of your canvas.
There are tons of tutorials online about how to make these so I'll spare you all the steps, but I bet you can figure it out yourself. Besides, the back doesn't have to look nice, no one will see it! I simply stretched the fabric over the front, stapled in the back (folding and trimming bulk at the corners). Then, I laid out the ribbon in a diamond pattern and stapled each ribbon in place on the back also. I used my exacto knife to cut a small slit through the ribbon, fabric and canvas so that I could poke a rhinestone brad through all the layers and hold the ribbon tight to the board. Then I hung it in place and tacked up a few of my ideas and notes for projects I want to make.

Now, I think this little crafty corner is complete! {and my last picture of this space...I promise!}See some of my bead stuff laying on the desk? I was actually in my crafty space making some jewelry last night (but didn't get it all put away because my daughter woke up sick...again). My HUGE goal for 2009 is to FINALLY get serious about turning my hobby into a little extra $$$. I'm considering opening an etsy store but also looking for some craft shows in the DFW area. Anyone know about any spring craft shows in the DFW area?

Tuesday, January 6, 2009

One of my favorite Christmas gifts to give this year...

One of my favorite Christmas gifts to give this Christmas was a tin tea set with homemade felt cookies for my daughter. I saw some adorable sets on etsy, but decided to make some cookies myself and went on a hunt for a cute tin tea set. Here is what she received this year. Isn't it cute?
I found the tin tea set at a local kids toy store and then began the simple process of making felt cookies. I made sugar cookies and chocolate chip cookies. They were so fun to make and I made quite a few extra that we'll use for gifts at upcoming birthday parties this year. I just used the cheap felt that you can buy at any craft store (comes in tons of colors) and traced a lid to a jar for my cookies. I didn't take pictures of the process but I'm sure you can imagine how easy this was and I bet a google search will turn up lots of results if you need help. I didn't use a pattern for my icing layer...just cut until it looked good...and then stitched sprinkles on it. I made a few with beads first and then decided to go with the embroidery floss for the sprinkles until my daughter is a little older and won't try pulling them off. Then I just stitched the icing layer to the top circle and then stitched the two circles together and added a little batting to them before I stitched them closed. If you do a search on etsy or google for felt food, you'll find a ton of ideas. My sisters in law made these sweet cookies for Breanna. There are sugar cookies, an adorable Oreo with cream filling (I should have taken a better picture of it so you could see the filling!) and the cute fortune cookies! I love them and what's even better is that my daughter will be playing with these for years to come. I love that they're hand made and the possibilities are endless.

Have you made any felt food? I think they're all adorable and can't wait to make some more pieces for my kids play kitchen.

Thursday, December 11, 2008

Too many crafts...not enough time!

I made a promise {same one I seem to make every year} to myself that I was going to make a bunch of the gifts I give this year. I always seem to wait too long to begin {guess 364 days isn't enough time for me to prepare for Christmas} However, I am proud to say that I'm actually making good on my promise this year! I'm making LOTS of handmade goodies and unfortunately, will have to wait to show you most of them for a few weeks. However, here are a few things I was working on last night.

Button Snowman Onesie

This was just a basic red turtleneck onesie that I embellished. I know I've seen a post or two with these along with some pictures on flickr...just can't remember where I found them to give the original person credit. Anyways, I have a bunch of vintage buttons that my great grandmother used to collect, so I used a few for this. {Forgive the terrible pictures...my hubby just got a digital SLR yesterday but we still need some lenses and need to learn how to use it. I hope my images will improve in quality in the near future.} In the mean time, you get to look at a yellow snowman. The buttons are actually a beautiful ivory color with a pearly sheen to them. I think one of them is a mother of pearl button. I'm not thrilled with how the little faux scarf turned out so I'll probably fix it later but for now, this is what she'll wear. I think this would also be really cute on some tea towels.

Elastic Bookmarks

As I was getting ready to go to bed last night, I noticed Nikki had updated her blog. I love her blog, Whimsy love! She had posted some adorable elastic bookmarks. You can see the tutorial here {and while you're there, check out some of her other tutorials, lots of cute stuff} I realized I had everything I needed to make them and couldn't go to sleep until I'd made some myself. :) So, I spent 15 minutes hunting down my various elastics before I remembered I'd gotten it all out to add some closures to my pocket calendars {go check the post back out, I updated it a week or so ago and I like them even more now} Once I found everything, I had 5 bookmarks made in just a matter of a few minutes. I would have made 50, but I need to get some more elastic. If you can use a ruler, a pair of scissors and know how to tie a knot, then you can make this project! Here's what I made {and again, forgive the poor pics}

I think these bookmarks would be adorable wrapped around a small gift instead of using a bow. Because they're elastic, they stay in place...no more losing your spot in your book because your 20 month old pulled out your bookmark again!
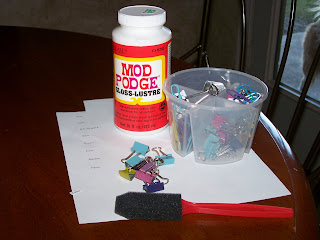
Okay, I'm heading to Hobby Lobby for the third time this week! I need some more trim to make tassels. I'll show yall those soon.

Saturday, November 29, 2008

Conversation Pebbles

I saw this cute idea while watching HGTV over the weekend. {I think it was on a Decorating Cents holiday special, but don't hold me to that} Anyways, on one of the tables they were setting for the holidays, they placed the cheap little glass gems {vase fillers} around the centerpiece and also had some of the large ones mixed in with them. The host picked them up and revealed cute little conversation pebbles. I realized I had everything at home to make them and wouldn't have to get out on Black Friday to go get supplies!


They aren't the cutest things, but they really do help spark conversations at the table. I'm sure you could make them cute by using fun papers but I didn't want to limit them to one table scape and figured in this case, simple was better. I plan on bringing them out when we have company and just sprinkling them on the table. Since I still have a little one who likes to put things in her mouth, I won't use the small gems to decorate with. Anyways, I checked at Hobby Lobby while I was out on Saturday and you can get a 2 lb. bag of these large gems for $2.77 so this is a very inexpensive craft. By the way, the ones I used have that iridescent stuff on them but they looked and worked just fine. You can find "perfect large round gems" on ebay and etsy...but they're a lot more expensive and I think these irregular, iridescent ones work just fine for this.


All I did was type up a list of conversation starters that were appropriate for my kiddos and family. You can see in a few examples that I used questions like:

"My favorite thing to do with dad is...", " What do you think Heaven is like?", "What would you do if you were invisible for a day?", "What is your least favorite chore? Why?", "What has been the best day of your life so far?", etc.
I printed them out in size 8 & 9 fonts and made sure that my questions would fit under my pebbles without being cut off. Then, I just traced, cut {a large circle punch would have been great for this...adding that to my Christmas list now} and mod podged the circles to the back side of the stones. I pushed down to get rid of any air bubbles and then topped the back side off with two coats of mod podge to seal them.

My son picked these up at lunch today {because I was lazy and had left at least half a dozen projects I was working on on the kitchen table} and wanted to use them. My husband and I enjoyed listening to our son list 3 things he loved about his sister, explain to us what he thinks dad does at work, tell us his favorite joke and we got in on the fun too. It made for a very pleasant lunch and I think I'll make some more of these conversation pebbles and bring them out for no reason at all instead of waiting for a special occasion. :)


So these little guys were hard to photograph given the overhead light and their iridescent sheen, but you get the point, right?


Sunday, November 16, 2008

Custom {Organized} Binder Clips

My husband thinks I've lost it. He came in last night and saw me applying Mod Podge to binder clips, shook his head and walked out. Haha! I for one, LOVE them and have already put them to use organizing my stacks of papers!

So, here is a QUICK and easy project that will help you stay organized and would make a great addition to a teacher gift, too.

You'll need :

*Binder Clips {I had an assortment of cute colored ones from Staples-that's what is in the plastic tub, but plain black ones will be fine also.}

*Mod Podge

*sponge brush {or your finger if you really want to get messy}

*Your sayings printed out

*scissors


The binder clips come in varying sizes but the ones I used here have clips that measure 3/4" long and 1/2" high. I used a text font size 11 so that my text would fit on my clips once cut out. Adjust your font size to fit your clips.

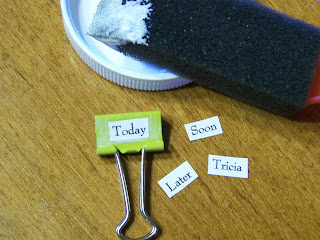
So, determine what sayings you want. I chose to do "today", "soon", "later", my name, my kids and husband's name all for sorting the papers, bills, field trip slips, etc. that seem to find their way to my kitchen counters. I also did a few sets with things like "2 be graded", "graded", "2 be copied", "handouts", and teachers names for teacher gifts. Type them up in a word program and print out. I then cut each word out and applied a thin layer of Mod Podge to one side of each clip. Next, I positioned each word in the middle of the clip while the Mod Podge was still wet. I let that coat dry and brushed another coat on top to seal and I was done.

Super quick, easy and cute...not to mention, practical. What other sayings or words would you put on yours?

Thursday, November 13, 2008

Creating a {Cute} purse size calendar...

{Edited 12/1/08 to add more pictures and another embellishment to the calendar!}

Chris, over at Just a Girl, was hosting an I Can Make That party on her blog this past Monday. I thought I'd make a submission and be fashionably late. Hey, I'm new to craft blogging...that's my excuse and I'm sticking to it. Check out her site for TONS of cute ideas and gifts that you can make also!

{First, a disclaimer: several of my friends will probably be receiving these as gifts this year, so please act surprised when you get one and pretend that you never saw this post!}

Two girlfriends from my MOPS group came over this morning for a few hours to help get our next craft prepped and make some examples for our next meeting. We spent the morning making cute picture frames {I'll post that craft next week after our meeting} and I decided after they left that I'd take advantage of having half my supplies sprawled out all over the kitchen and make some more stuff instead of cleaning. :)

Here is my submission to the I Can Make That {seriously, anyone can do this...cheap, quick and something everyone really uses. This would be great as a gift for a neighbor, stocking stuffer, mail man, friend, etc... Scroll all the way down to see just how cheap thrifty this project is}

So, up first was a quick transformation of a purse size calendar. I started with all of this:

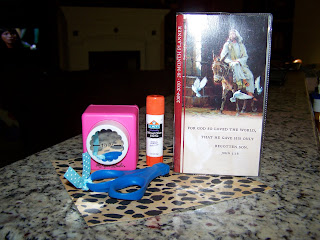
{Small calendar in clear sleeve, piece of scrapbook paper, scissors, glue stick, paper punch and not pictured: ribbon, glue, stamp pad and stamps}

1. Remove the calendar from it's plastic sleeve and trace it on the backside of the scrapbook paper.

2. Apply glue stick to the backside of the paper and adhere to the cover of the calendar.

Your calendar will now look something like this.

(I used a bone folder...that white thing next to the green mechanical pencil...to smooth out any air bubbles and make sure the paper is adhered. You can also use your finger or save those fake credit cards that come in your junk mail and use them to smooth your paper)

Next, I just embellished it a little. I didn't want to do too much with this wild pattern so I just stamped my name on a piece of paper, framed it with a scrap and glued down some ribbon. I put it back in the plastic sleeve and I was done! {If yours doesn't have a plastic sleeve, you may want to apply a coat or two of Mod Podge to keep it from getting torn up and ruined in your purse.}

Click on the picture for a larger view and you'll see that it's in the plastic sleeve.

What do you think? I certainly think it's much cuter now than it was when I originally purchased it. Oh, and did I mention that the total cost for this project was $1.00? I found the calendar at DollarTree and everything else was stuff I already had and you probably do too. If you make one, please comment and let me know. :)

{I've made several more of these since I first posted this but I won't show you pics yet because they're going to be gifts. Anyways, I have gone back and added a cute rhinestone brad to the front cover (punched a whole through the plastic cover, ribbon, paper and all) and added a piece of elastic that is held in place with an eyelet on the back) I found the idea for this over here. Now I like my calendar even more!}


Friday, November 7, 2008

Embellished Notebooks

I really need to figure out my camera settings and learn how to take better pictures! Thankfully our next speaker at MOPS (Mothers of Preschoolers) will be covering this topic. Yeah! Hopefully you can get a general idea despite my terrible picture. I was going to take more pics but then my camera battery died. I'll add that to my growing list of things to do today. Here is the first craft we did in our MOPS group this year. It's a bit of a challenge trying to come up with inexpensive crafts that you can do in a short amount of time with 50 or so women. :)

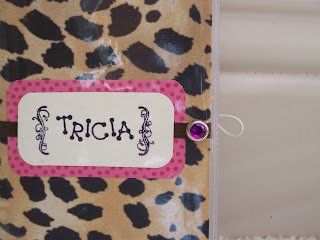
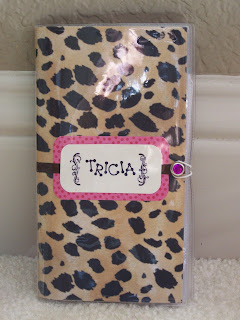
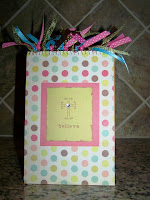
Anyways, you could use this idea to alter any spiral notebook but I really like the steno books with the spiral at the top. (Think of all the not-so-cute notebooks you can find for less than a dollar...oh, the possibilities!) You simply cover the notebook with scrapbook papers- including the spiral. I just made small cuts in the paper next to each spiral in order to completely cover the front and pressed the paper down between each spiral and glued. Because we're limited on time at our meetings, we just used a glue stick but when I make these at home, I use Mod Podge to adhere the paper to the notebooks and to seal it. Then you embellish with stamps, rhinestones, buttons, brads, stickers, etc. and then cut assorted ribbons that match your papers and knot onto each spiral. It's a quick and easy project and it seemed to go over well with the ladies in my MOPS group.

I had taken this picture before I decided to start a craft blog. In the future, I'll take more pics so you can see the progress and steps to completion. :) Now I'm off to see the dentist and get a new camera battery. Have a great weekend!